40 mail merge instructions for labels
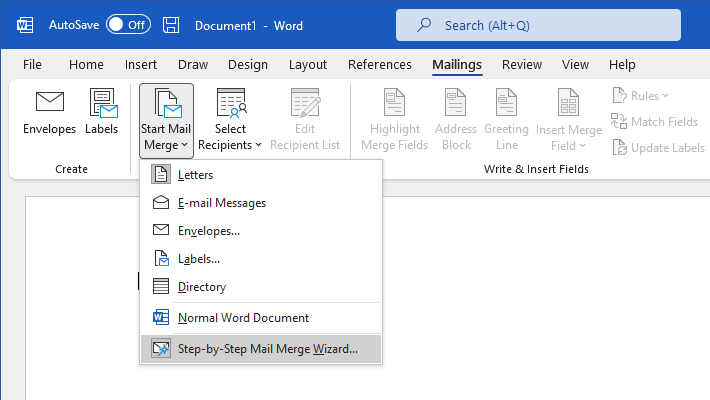
PDF How to Use Mail Merge to Create Mailing Labels in Word Click Next: Complete the merge Perform the merge In the Mail Merge task pane, verify that the Complete the merge step is displayed. 6. To merge on the screen, click Edit individual labels. The Merge to new document dialog box appears, so that you can select which records to merge. Select All and Click OK to merge the labels. Video: Use mail merge to create multiple labels Create and print labels Use mail merge Creating an MLA paper with citations and a bibliography Overview Transcript If you wanted to create and print a bunch of recipient address labels, you could type them all manually in an empty label document. But there's a much better way, and it's called Mail Merge. Watch this video to learn more. Want more?
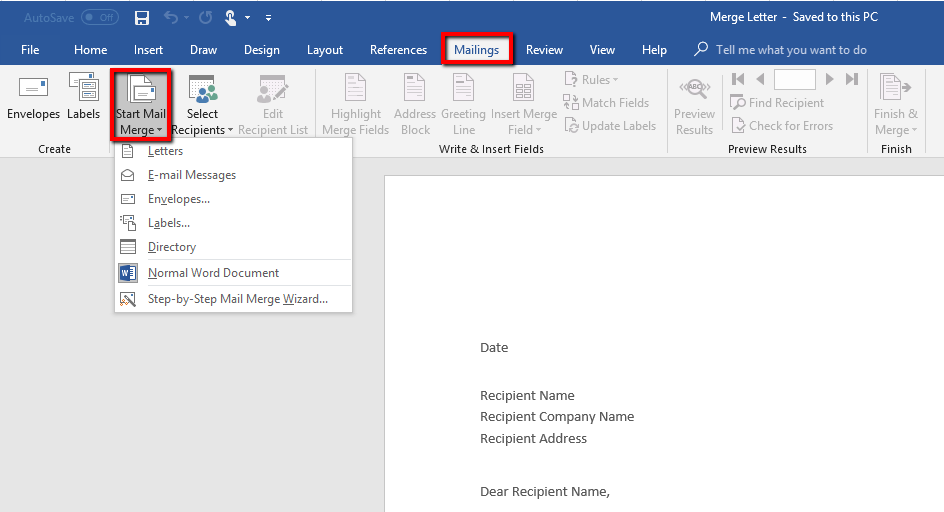
How to mail merge and print labels in Microsoft Word - Computer Hope Step one and two In Microsoft Word, on the Office Ribbon, click Mailings, Start Mail Merge, and then labels. In the Label Options window, select the type of paper you want to use. If you plan on printing one page of labels at a time, keep the tray on Manual Feed; otherwise, select Default.

Mail merge instructions for labels
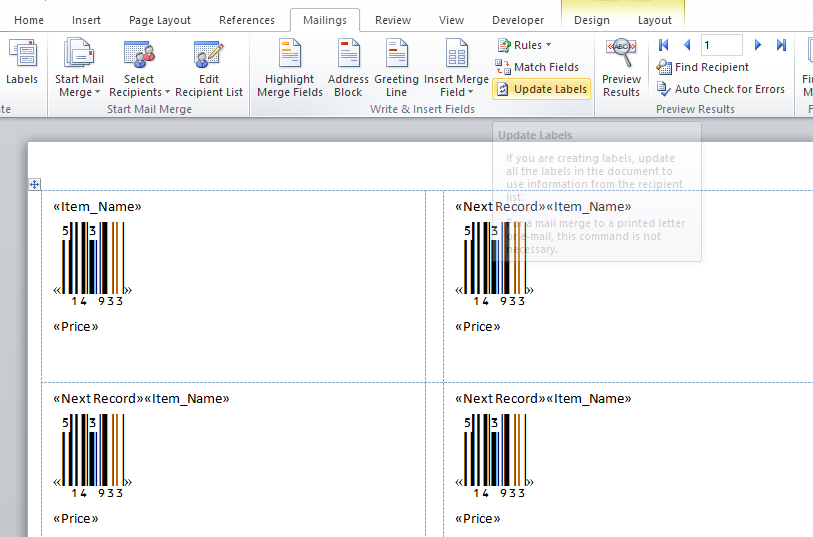
Take the Mystery Out of Mail Merge | Avery.com 4. Mail merge your information. Now you're ready for the fun part. If you're using Avery Design & Print, select a text box then click Start Mail Merge under the Import Data (Mail Merge) tools. The application will help you locate your file and upload the names, then format the labels the way you want and you're done. Using Microsoft Word to print labels | Label Line For basic instructions using the Mail Merge Wizard see below. Label Line Labels with Microsoft Word (727Kb) The Basics. This tutorial will show how to setup up a label mail merge in Microsoft Word. Step 1: Open Microsoft Word then click on the "Mailings" tab. Select "Start Mail Merge" then "Step by Step Mail Merge Wizard". Step 2: PDF Word 2016: Mail Merge - Labels - Prairie State College 15. Select Update all labels. 16. Make any changes to the font style or size on the labels. 17. Select Next: Preview your labels. 18. Make sure the labels look correct. 19. Select Next: Complete the merge. 20. To finalize the merge, select Print. 21. If you will need to print this same list of labels again, save the document.
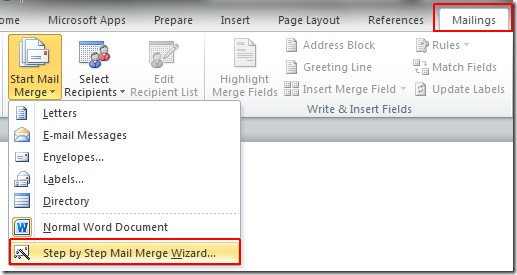
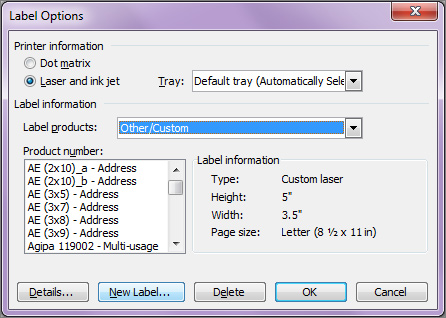
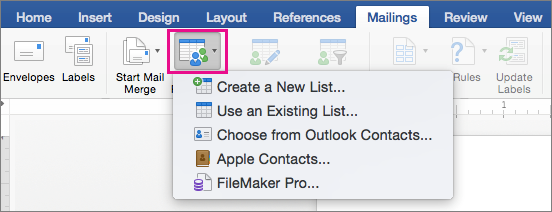
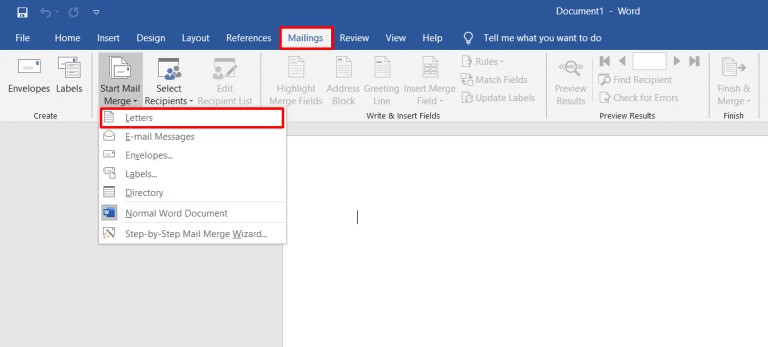
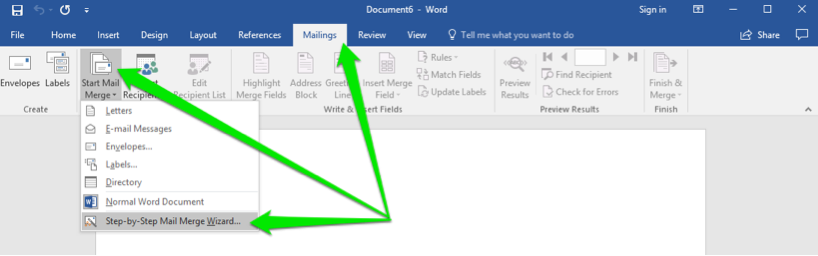
Mail merge instructions for labels. How To Do a Mail Merge in Word Using an Excel Spreadsheet In Word, open the existing file and press the 'Mailings' tab in the main menu. On the Mailings tab, choose the 'Start Mail Merge' button, a list of different types of documents will drop down (i.e. Letters, E-mail Messages, etc.). choose the kind of merge you want to run. Now choose the 'Select Recipients' button and choose 'Use ... How to Create Mail Merge Labels in Word 2003-2019 & Office 365 If you're making another type of document, use the "Insert Merge Files" button in the "Mailings" tab. Be sure to add spaces, commas, etc if you're creating your own layout. Hit the "Update all labels" button and then "Next: Preview your labels." Check that your data copied over correctly and you're happy with the final result. PDF How to Mail Merge Labels Printing the mailer labels: 1. To print, select Finish & Merge from the right side of the Mailings toolbar 2. Select Edit Individual Documents 3. In the Merge Records pop-up, choose All and then select OK 4. You will now be presented with a list of all the mail labels that will be printed 5. When you are ready to print, hit CTRL+P to navigate ... Print labels for your mailing list - support.microsoft.com We will use a wizard menu to print your labels. Go to Mailings > Start Mail Merge > Step-by-Step Mail Merge Wizard. In the Mail Merge menu, select Labels. Select Starting document > Label Options to choose your label size. Choose your Label vendors and Product number. You'll find the product number on your package of labels. Select OK .
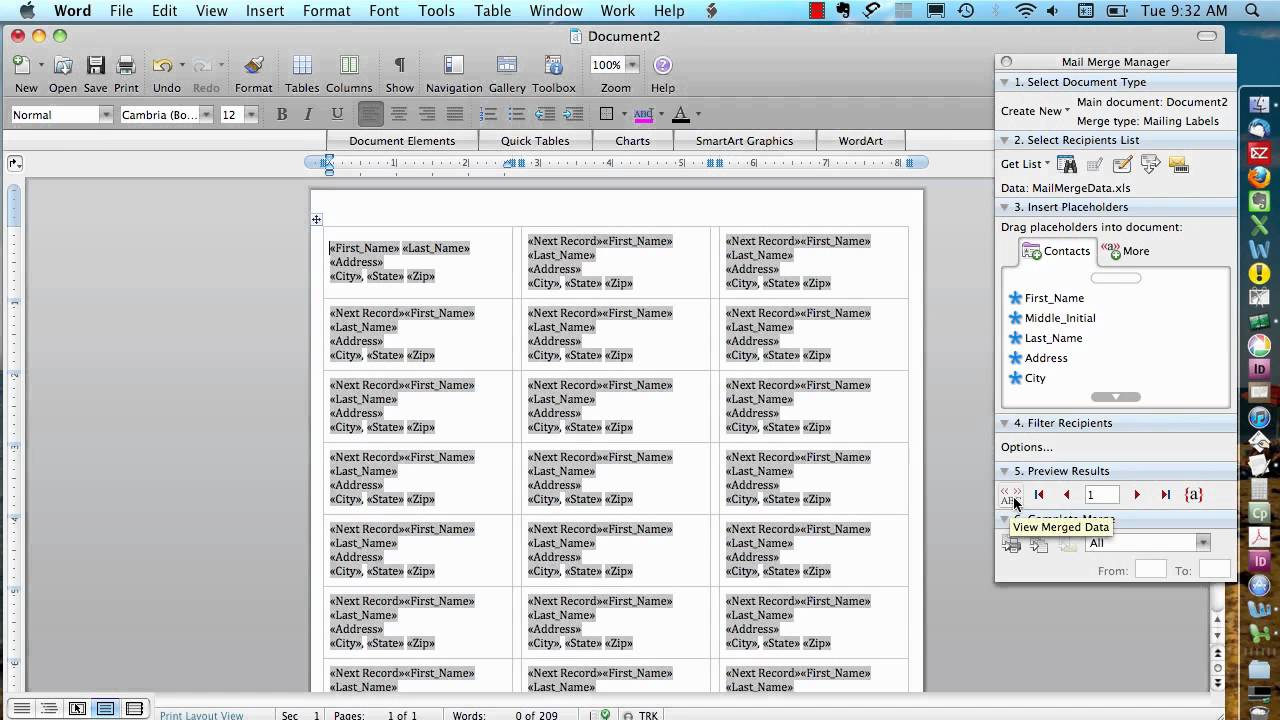
Mail Merge Guide - OnlineLabels Launch Maestro Label Designer and sign in. Open a new or saved template. Hover over "Tools" in the blue navigation bar and select "Mail Merge," then hit "Start Mail Merge." You will be prompted to add a new datalist or use an existing list. Note: If you don't have a document created yet, learn how to make one . How to mail merge from Excel to Word step-by-step - Ablebits.com Go to the previous field. Alt+Shift+E. Edit the mail merge document. Note, this will break the connection between your Excel file and Word document, as a result your mail merge source won't be automatically updated any longer. Alt+Shift+F. Insert a merge field from your mail merge source. Alt+Shift+M. How to Create Mail-Merged Labels in Word 2013 - dummies > field, pressing Shift+Enter, inserting the < > field, typing a comma and a space, inserting the < > field, typing two spaces, and inserting the < > field. Choose Mailings→Update Labels. The code from the upper-left cell is copied to all the other cells. Choose Mailings→Preview Results. The four label results appear. Save the document. Creating Address Labels Using Mail Merge in Office 365 - enKo Products Creating Address Labels efficiently using Mail Merge 1. Launch Mail Merge from Word 2. Start a Document 3. Select your Recipients 4. Arrange your Labels 5. Preview your Labels 6. Complete the Merge Final Thoughts Frequently Asked Questions Now, if you're working on a tight budget or want to lower costs, a DIY approach may be ideal.
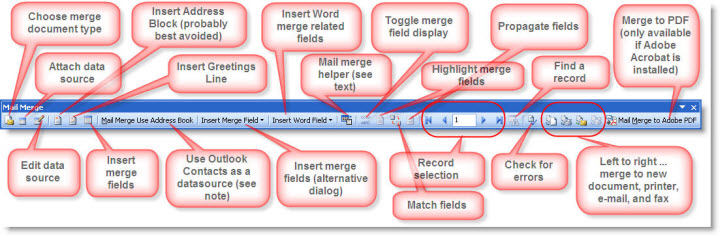
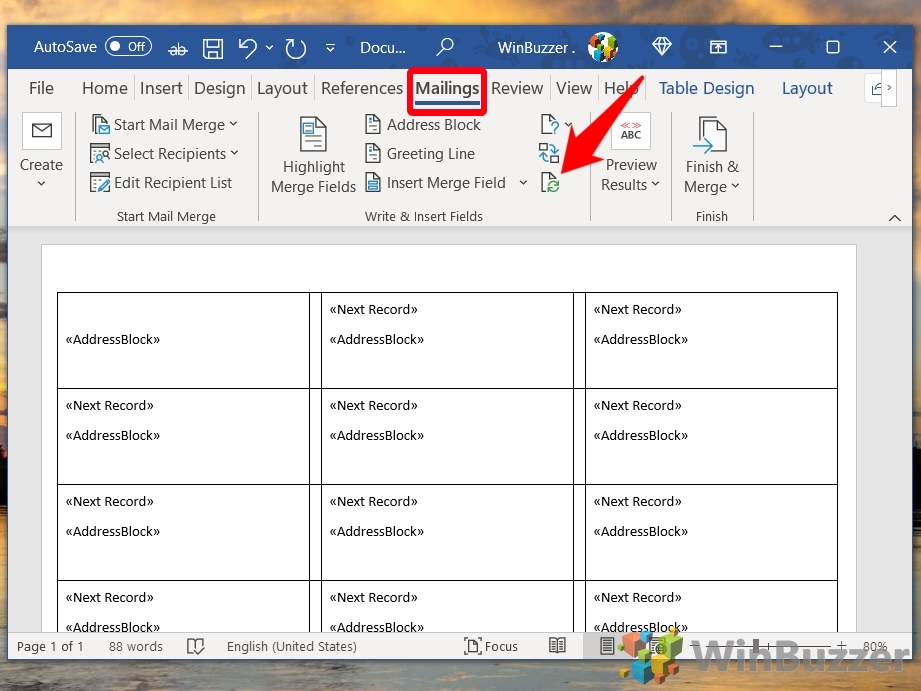
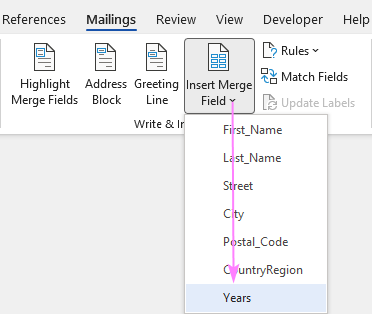
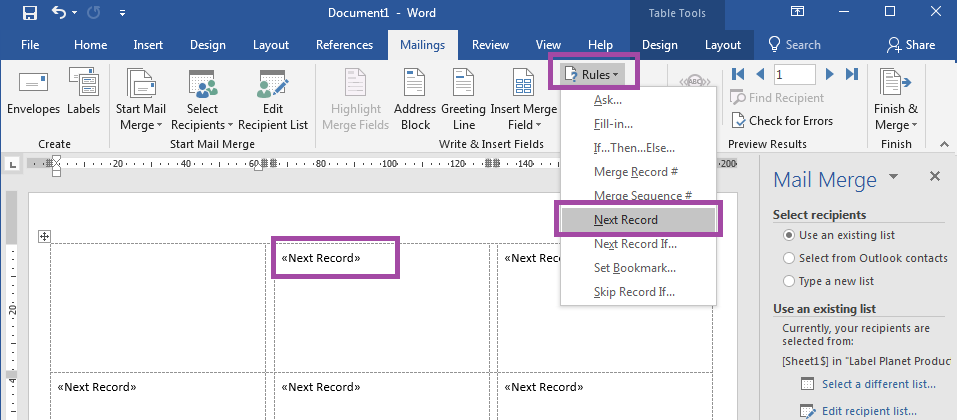
How to Mail Merge from MS Word and Excel (Updated Guide) Here's a step-by-step guide on how to create a mail merge template in MS Word: Step A Open a new document ( blank document) in Word. This is the main document for your mail merge. Step B Click on the Mailings tab and select Start Mail Merge. A drop-down menu displaying every different mail merge document type will appear. How to mail merge and print labels from Excel to Word - Ablebits.com When arranging the labels layout, place the cursor where you want to add a merge field. On the Mail Merge pane, click the More items… link. (Or click the Insert Merge Field button on the Mailings tab, in the Write & Insert Fields group). In the Insert Merge Field dialog, select the desired field and click Insert. Use mail merge for bulk email, letters, labels, and envelopes Create and print a batch of personalized letters. Email where each recipient's address is the only address on the To line. You'll be sending the email directly from Word. Create and send email messages. Envelopes or Labels where names and addresses come from your data source. Create and print a batch of envelopes for mailing. How to Mail Merge Address Labels Using Excel and Word Oct 21, 2021 · Open Word and go to "Tools/Letters" and "Mailings/Mail Merge". If the Task Pane is not open on the right side of the screen, go to View/Task Pane and click on it. The Task Pane should appear. 4 Fill the Labels radio button In the Task Pane. 5 Click on Label Options and choose the label you are using from the list. Click OK once you have chosen. 6
Mail Merge: Creating Form Letters and Labels
How to Mail Merge Labels from Excel to Word (With Easy Steps) - ExcelDemy STEP 2: Insert Mail Merge Document in Word. Now, we have to set up the Word for merging the Excel file to insert the Mail Merge Document. So, learn the process below. Firstly, open a Word window. Now, go to the Mailings tab. Next, select Step-by-Step Mail Merge Wizard from the Start Mail Merge drop-down.

Mail Merge in Google Sheets: Easy Step-by-Step Guide 2022
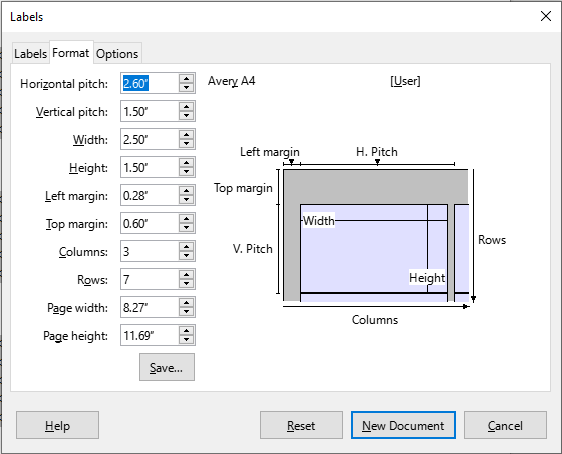
How to Create Labels With a Mail Merge in Word 2019 Open a blank document in Microsoft Word. Go to Mailings > Start Mail Merge > Labels. In the Label Options dialog box, choose your label supplier in the Label products list. In the Product number list, choose the product number on your package of labels. Tip: If none of the options match your labels, choose New Label, enter your label's ...

Technology / Mail Merge Labels
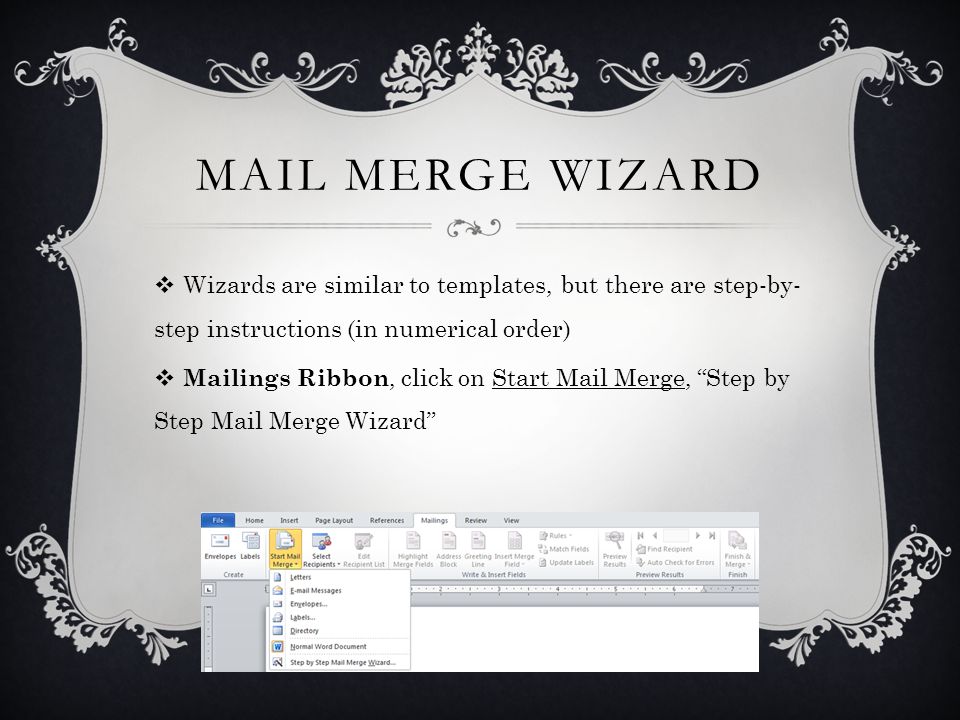
How to Create Mail Merge Labels in Word 2003-2019 & Office 365 Select "Step-by-Step Mail Merge Wizard." Choose "Labels" and click "Next: Starting document." Select the "Start from a template" option and click "Next: Select recipient." Choose "OnlineLabels.com" from the second dropdown list and find your label product number in the list.
Word 2010 Mail Merge
How to Make and Print Labels from Excel with Mail Merge - WinBuzzer Open the "Mailings" tab of the Word ribbon and select "Start Mail Merge > Labels…". The mail merge feature will allow you to easily create labels and import data to them from a...
How to Do a Mail Merge Using Word and Excel
How to Mail Merge in Microsoft Word (with Pictures) - wikiHow Open Word and go to Blank document > Mailings > Select Recipients > Use an Existing List…. Choose your Excel sheet. Go to the spot you want to insert contact information and click Insert Merge Field. Select the desired headers from your Excel document. Click Finish & Merge.
Mail merge with Word 2002/3
PDF Microsoft Office 2010 Word Mail Merge Instructions - College of Charleston Word Mail Merge Instructions Overview One document (letter, envelop, e-mail, label, etc.) that is reproduced numerous times with custom "fields" or fill-in-the blanks for each time it is reproduced: The Process 1. Decide on and name all fields that will be "fill-in-the-blank" 2.
Mail Merge With A Microsoft Access Database
PDF Mail Merge Instructions for Labels - MS Word - ncsetoff.org Instructions for Creating Labels with a Mail Merge Using Microsoft Word 2003 and DebtSetoff version 2005.02 or later Microsoft Word Prerequisites: 1. Create the letters first and print them Process: 1. Select Tools a. Select Letters and Mailings b. Select Mail Merge 2. Choose Labels for Select document Type

Word: Mail Merge – Athens State University Knowledge Base
Video: Create labels with a mail merge in Word Once your mailing addresses are set up in an Excel spreadsheet (see the previous video to learn how), it's a snap to get Word to create mailing labels from them. Create your address labels In Word, click Mailings > Start Mail Merge > Step-by-Step Mail Merge Wizard to start the mail merge wizard.

Video: Use mail merge to create multiple labels
Create Letters or Labels using Mail Merge Wizard (Instructions are based on Microsoft Word 2007, but are similar in Microsoft Word 2010). Use the Mail Merge step-by-step Wizard when you want to create a set of labels or documents such as a standard letter that is sent to multiple recipients.. You will need: 1) A letter or blank document. 2) Your recipient information (name, address) stored in a separate file, such as an Excel Spread sheet.
How to Use Microsoft Mail Merge to Print 4up Place Cards
Mail merge using an Excel spreadsheet - support.microsoft.com Word for Microsoft 365 Word for Microsoft 365 for Mac Word 2021 More...
How To Do a Mail Merge in Word Using an Excel Spreadsheet ...
PDF Word 2016: Mail Merge - Labels - Prairie State College 15. Select Update all labels. 16. Make any changes to the font style or size on the labels. 17. Select Next: Preview your labels. 18. Make sure the labels look correct. 19. Select Next: Complete the merge. 20. To finalize the merge, select Print. 21. If you will need to print this same list of labels again, save the document.
Print labels for your mailing list
Using Microsoft Word to print labels | Label Line For basic instructions using the Mail Merge Wizard see below. Label Line Labels with Microsoft Word (727Kb) The Basics. This tutorial will show how to setup up a label mail merge in Microsoft Word. Step 1: Open Microsoft Word then click on the "Mailings" tab. Select "Start Mail Merge" then "Step by Step Mail Merge Wizard". Step 2:
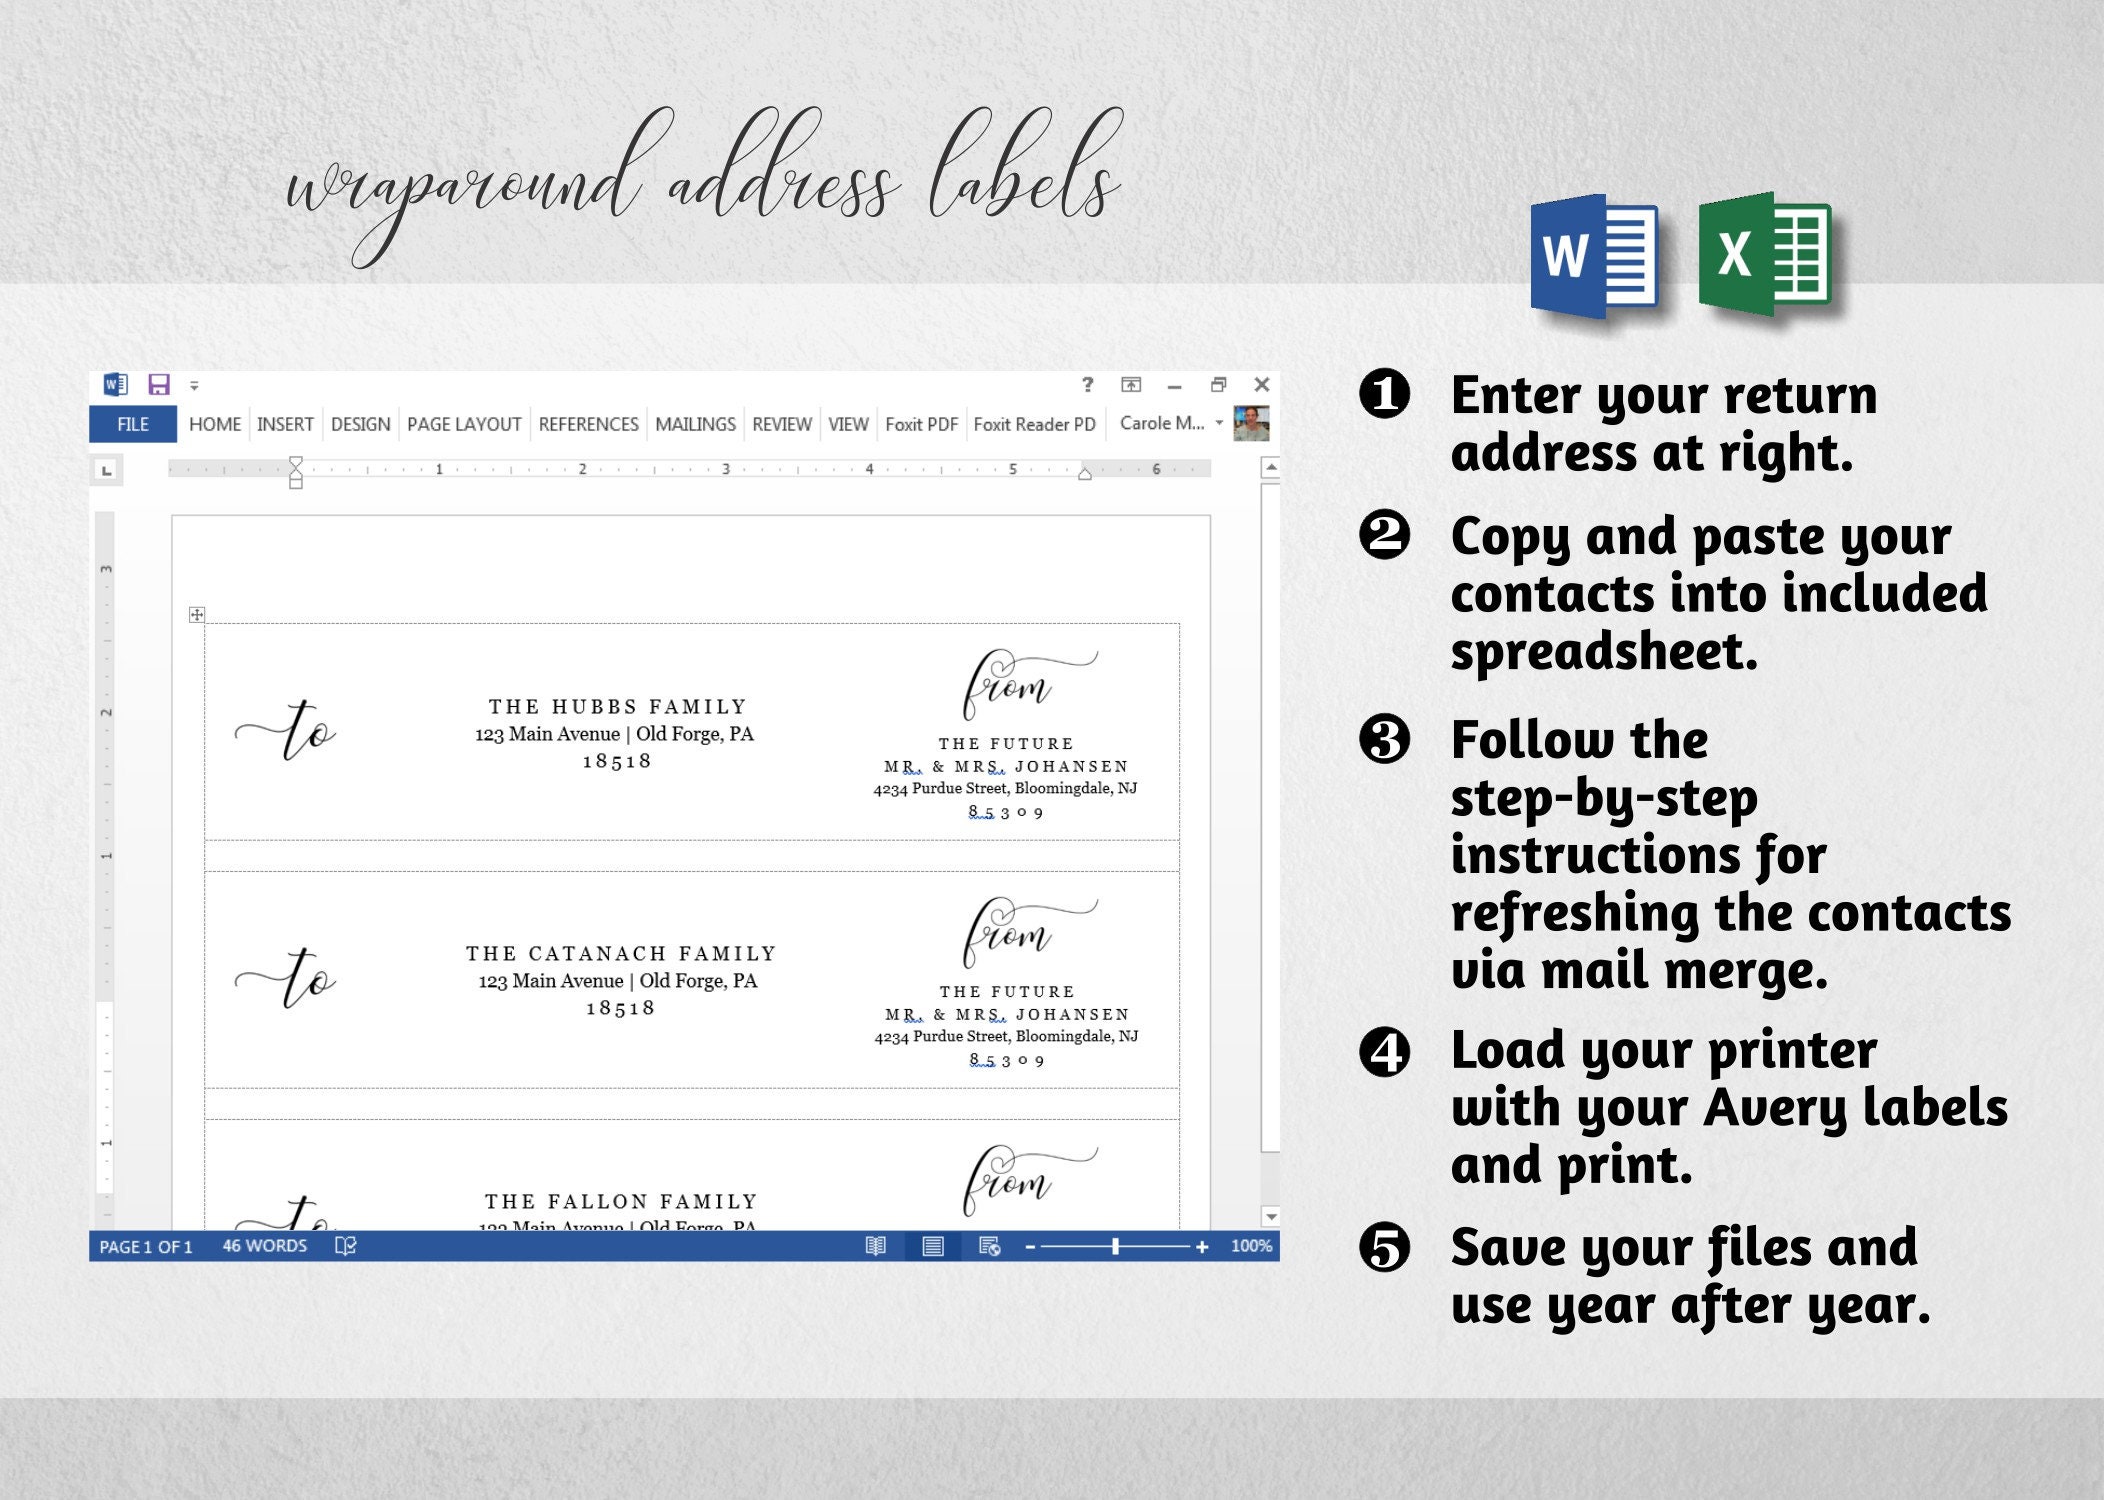
Mail Merge Address Template for Wraparound Labels - Microsoft Word Excel Avery 22838 - Printable Wrap Around - Instant Download Digital File
Take the Mystery Out of Mail Merge | Avery.com 4. Mail merge your information. Now you're ready for the fun part. If you're using Avery Design & Print, select a text box then click Start Mail Merge under the Import Data (Mail Merge) tools. The application will help you locate your file and upload the names, then format the labels the way you want and you're done.
How to Use Mail Merge in Microsoft Word | Webucator

Mail Merge: Creating Form Letters and Labels

Assignment: Use Mail Merge | Computer Applications for Managers
How To Create A Mail Merge Data List
Mail Merge

Setting up Mail Merge - Office Skills Blog
How to Mail Merge from MS Word and Excel (Updated Guide)
How to Make and Print Labels from Excel with Mail Merge
KB10028 - Tutorial: Creating barcode labels with Microsoft ...
Using Microsoft Word to print labels | Label Line
How to Use Mail Merge to Create Mailing Labels in Word
MAIL MERGE IN WORD 2010 Created by: Jennifer Tyndall, Spring ...

Use mail merge for bulk email, letters, labels, and envelopes
Creating A Mail Merge For Bulk Mailing / Shipping Label Projects
How to Create Mail Merge Labels in Word 2003-2019 & Office 365
Mail Merge from Word to Outlook | Outlook Freeware
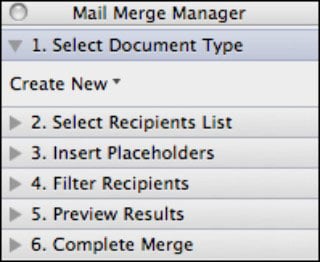
Mail Merge for Mac - Labels
Quick Guide: Mail Merge-Labels - Exploring TntConnect ...

How to Mail Merge in Microsoft Word (with Pictures) - wikiHow
Assignment: Use Mail Merge | Computer Applications for Managers
How to mail merge from Excel to Word step-by-step

How to Mail Merge Your Wedding Guest List & Why You Should ...
Chapter 14 Mail Merge
How to Create Mail Merge Labels in Word 2003-2019 & Office 365
How to Create a Mail Merge in Word 2011 for Mac - dummies

Manual Mail Merge Setup in Word 2010 - Simon Sez IT
How To Print Address Labels Using Mail Merge In Word
Post a Comment for "40 mail merge instructions for labels"